Knowing you need to set up an email platform and actually doing the thing can be a source of frustration and procrastination.
In this blog, we are going to walk through (yes, together my beautiful not-so-techy friend) how to set up a simple newsletter in MailerLite.
Log into your MailerLite account
When you first log into your MailerLite account, you will be taken to the Dashboard. This area is where you can find your metrics (open rates, clicks etc) from any email campaigns that you have sent previously.
Don't worry if this is the first time you have used it - it's OK to start today!
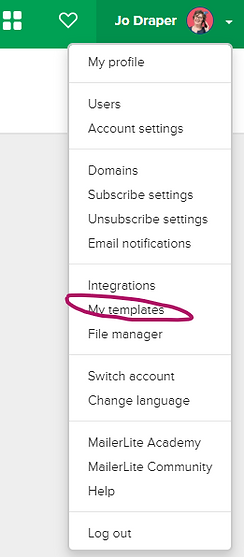
Now head to the top right hand corner (mine has my photo as I have set up my profile etc but yours may have a MailerLite logo or a circle with words.

You're looking for 'My templates' in the list - head there now.
Now you're looking for a huge orange button that says 'Create template' - you can't miss it, it's on the top toolbar.
Click the button.
MailerLite will now ask you to give your template a name - you can use whatever you choose, eg newsletter etc (you can choose something that means something to you).
Start from scratch (free plan)
Hit the orange button (at the time of writing this blog) that says 'choose' - drag and drop editor.
MailerLite will now populate some of the design for you - for example, your logo should drop in, there will be a header, somewhere to drop images, a button and some other bits and bobs.
Do not feel like you have to have everything.
If you have created your own email header in Canva, then remove the logo and add this image instead. You might have to drag it out to fill the space.
If you want to add something else, head to the left hand side. You can search by the type of thing you need, eg image or text or use the dropdowns to have a look what is there. I find that the best thing is to have a play around and see what works for you and your business. Everyone is different.
When you click into one of the blocks, say the header, you will have two tabs - Content and Settings.
Contents is where you will type and add your links and Settings is where you can change the fonts and colours etc if you haven't already set them up in your branding.
If you want to add your social links, head to the left hand side and search for 'social links'. You will need to add in all your links and then this will save to that template.
Once you're ready, his 'Save template' (green button in the top right hand corner).
You did it!
Woo hoo! Go you! Give yourself a huge high five.
You created your first MailerLite template.
Repeat this process as many times as you need to for the different types of emails your business sends.
Thoughts from Walt Disney
"First, think. Second, believe. Third, dream. And finally, dare
- Walt Disney
I can't go a whole blog post without giving you a great Disney quote.
This one makes me think about business. When we start, we think we would like to start a business.
Once we've created our business name, registered our domain and got ourselves set up, we believe we can run our own business.
Next we dream about all the amazing clients that we are going to work with.
Finally, we do it, we step into the light and dare to create something absolutely amazing.
Until next time, big love and chat real soon, Jo xx

Comments